This is part1 of configuring VCF SSO. To setup VCF SSO, we need to configure an Identity Provider.
In the part2 we will configure VCF SSO using this Keycloak IdP.
VCF9 supports below different types of identity providers as listed below.

For this lab setup I am choosing Keycloak IdP. Keycloak is an open-source Identity and Access Management (IAM) solution that acts as a powerful Identity Provider (IdP) for modern applications. It is fully OIDC and SAML compliant, making it easy to integrate with platforms like VMware Cloud Foundation (VCF) for centralized authentication.
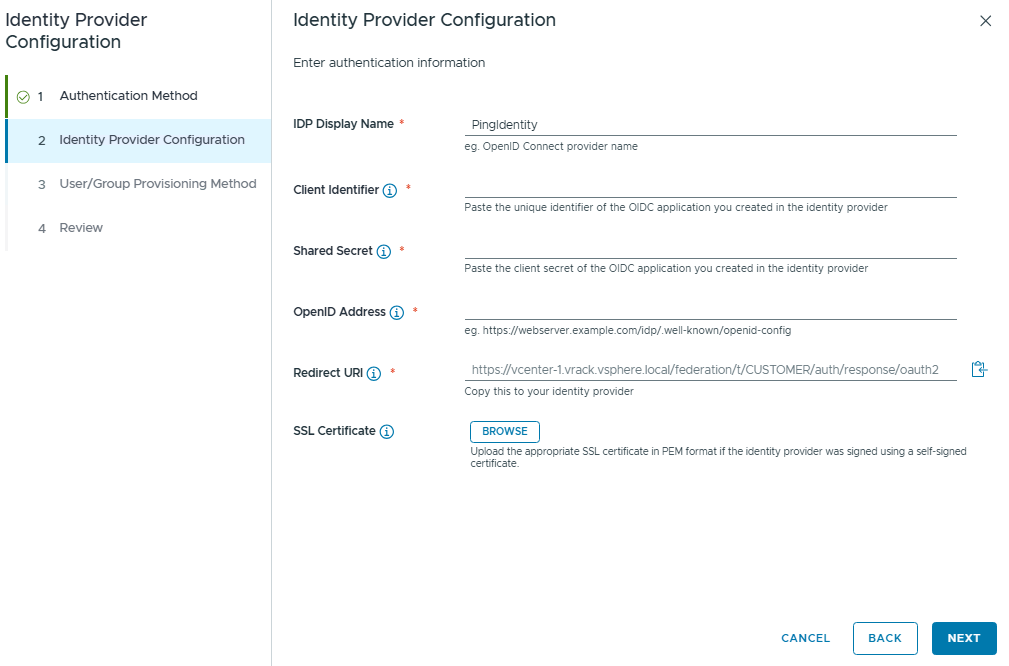
As we noticed above, we don’t see Keycloak IdP option directly here, but we can select Ping Identity option to configure Keycloak IdP.
From the external Identity provider, we need to gather below details:
- IDP Display Name
- Client Identifier
- Shared Secret
- OpenID Address
- SSL Certificate
Please note that we need to take a note of this Redirect URL to configure the OIDC client in our Identity provider configuration.
Now we know which details are required for the Keycloak Identity provider configuration, lets proceed with Keycloak setup.
Keycloak Installation on Ubuntu
I have installed Ubuntu 24.04 VM in my Lab.
There are multiple ways of installing Keycloak on Ubuntu. I have chosen docker method. Please refer the install options here.
On the ubuntu VM, make sure you configured the network, DNS, assign an IP address, make sure it is reachable to VCF Management network.
Install docker on Ubuntu VM:
sudo apt update
sudo apt install -y ca-certificates curl gnupg

# Docker repo
sudo install -m 0755 -d /etc/apt/keyrings
curl -fsSL https://download.docker.com/linux/ubuntu/gpg | sudo gpg --dearmor -o /etc/apt/keyrings/docker.gpg
echo \
  "deb [arch=$(dpkg --print-architecture) signed-by=/etc/apt/keyrings/docker.gpg] \
  https://download.docker.com/linux/ubuntu \
  $(lsb_release -cs) stable" | \
  sudo tee /etc/apt/sources.list.d/docker.list > /dev/null

sudo apt update
sudo apt install -y docker-ce docker-ce-cli containerd.io
sudo usermod -aG docker $USER
#Note, after this command, we need to logout and login once.

labuser01@labauth01:~$ docker version
Client: Docker Engine - Community
 Version:           29.1.2
 API version:       1.52
 Go version:        go1.25.5
 Git commit:        890dcca
 Built:             Tue Dec  2 21:55:19 2025
 OS/Arch:           linux/amd64
 Context:           default

Server: Docker Engine - Community
 Engine:
  Version:          29.1.2
  API version:      1.52 (minimum version 1.44)
  Go version:       go1.25.5
  Git commit:       de45c2a
  Built:            Tue Dec  2 21:55:19 2025
  OS/Arch:          linux/amd64
  Experimental:     false
 containerd:
  Version:          v2.2.0
  GitCommit:        1c4457e00facac03ce1d75f7b6777a7a851e5c41
 runc:
  Version:          1.3.4
  GitCommit:        v1.3.4-0-gd6d73eb8
 docker-init:
  Version:          0.19.0
  GitCommit:        de40ad0
With this docker is installed.
We will create a network for keycloak service and DB service.
We deployed a Postgres DB for storing the IdP configuration. to connect to the postgres DB, we have created the “keycloak-net” network.

Then we created the Postgres DB service and connected to this network. I have used postgres:16 image for this.

Next, we will create certificates for HTTPS IDP configuration.
sudo mkdir -p /opt/keycloak-certs
sudo openssl req -x509 -nodes -newkey rsa:2048 \
  -keyout /opt/keycloak-certs/keycloak.key \
  -out /opt/keycloak-certs/keycloak.crt \
  -days 365 \
  -subj "/CN=labauth01.local" \
  -addext "subjectAltName=DNS:labauth01.local"

sudo chmod 644 /opt/keycloak-certs/keycloak.key
sudo chmod 644 /opt/keycloak-certs/keycloak.crt
Please download this keycloak.crt file from Ubuntu VM to local machine, this will be used later during the IdP configuration in VCF SSO setup.
Now we will deploy the Keycloak service in production mode. and confirm that both DB and Keycloak services are up and running.
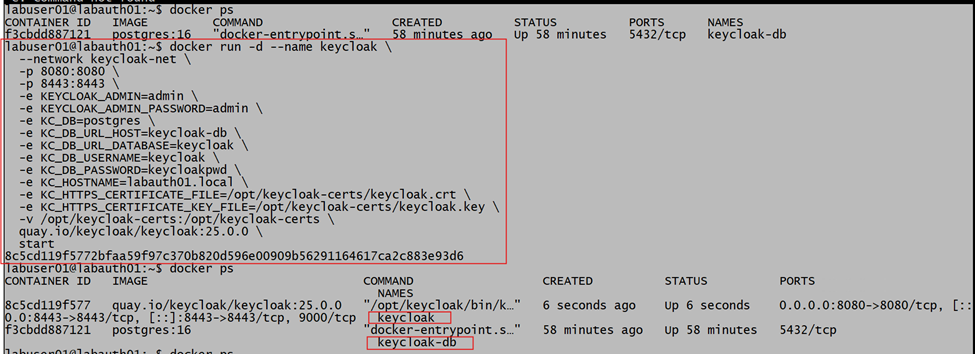
To deploy the Keycloak service in production mode, we need to provide the DB details, and we need to connect this service to the same network we created earlier.
docker run -d --name keycloak \
--network keycloak-net \
-p 8080:8080 \
-p 8443:8443 \
-e KEYCLOAK_ADMIN=admin \
-e KEYCLOAK_ADMIN_PASSWORD=admin \
-e KC_DB=postgres \
-e KC_DB_URL_HOST=keycloak-db \
-e KC_DB_URL_DATABASE=keycloak \
-e KC_DB_USERNAME=keycloak \
-e KC_DB_PASSWORD=keycloakpwd \
-e KC_HOSTNAME=labauth01.local \
-e KC_HTTPS_CERTIFICATE_FILE=/opt/keycloak-certs/keycloak.crt \
-e KC_HTTPS_CERTIFICATE_KEY_FILE=/opt/keycloak-certs/keycloak.key \
-v /opt/keycloak-certs:/opt/keycloak-certs \
quay.io/keycloak/keycloak:25.0.0 \
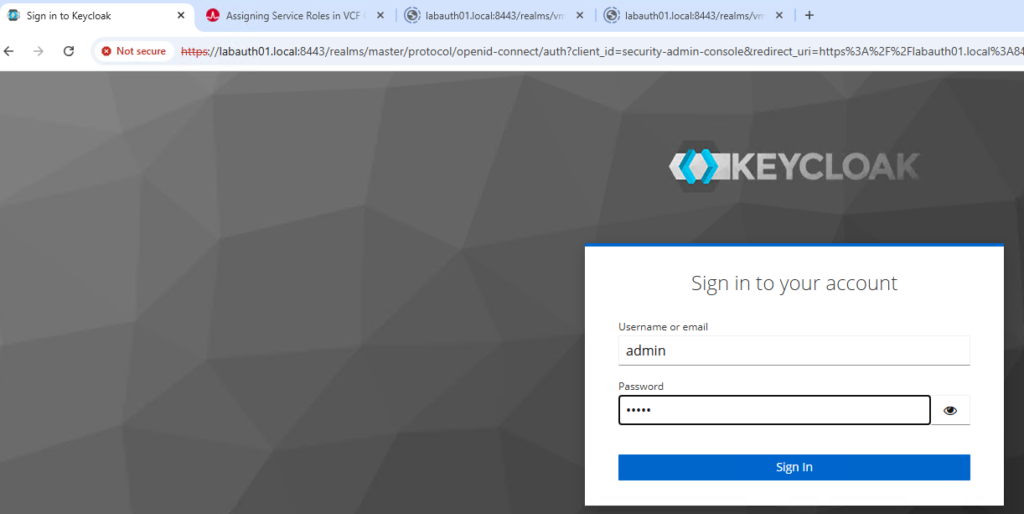
startOnce the Keycloak and DB services are up and running, we can launch the browser session with this URL https://labauth01.local:8443 and login with given credentials.
Keycloak IdP configuration
By default, Keycloak will have one Realm which is Master Realm, for our lab we will create a separate Realm.
In Keycloak, a Realm is the top-level boundary for identity and security management. Think of it as a separate security domain with its own users, groups, clients, roles, and authentication settings. In simple terms, it is an isolated identity space.
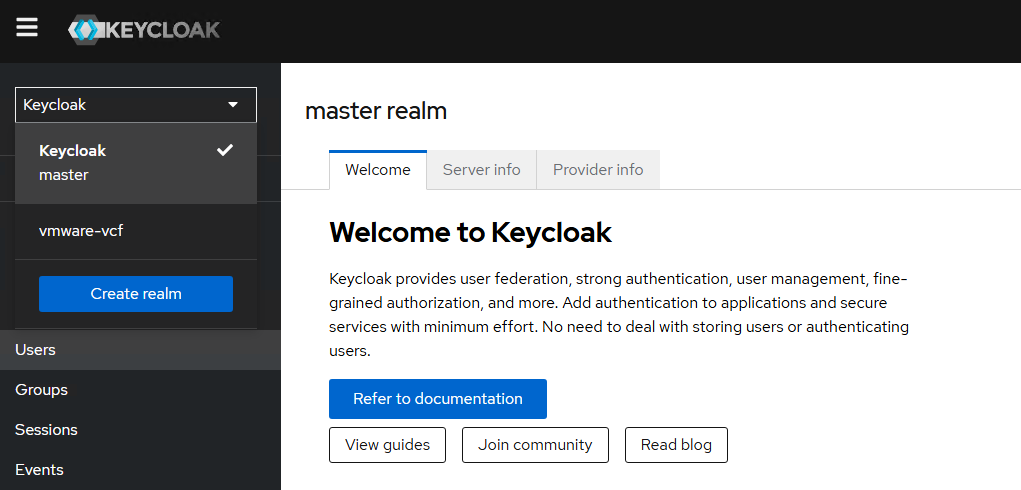
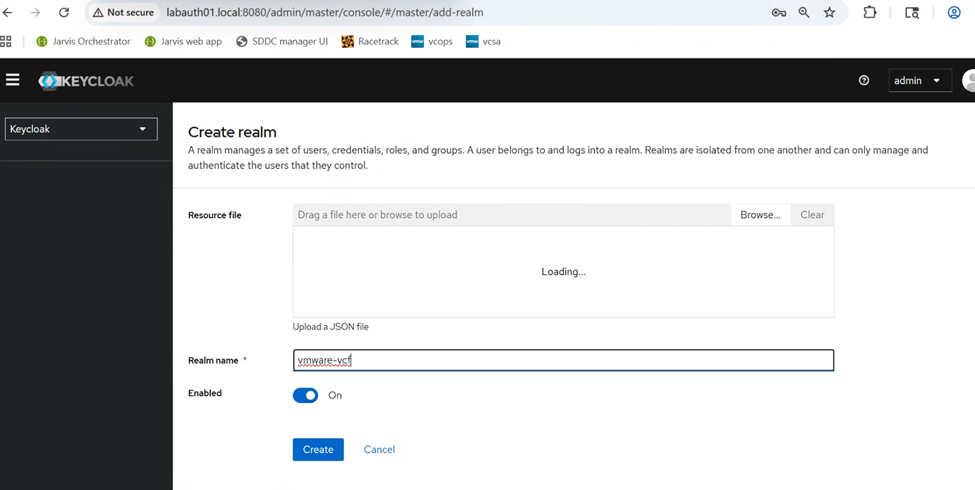
Click on “Create realm” to create a new Realm for our VCF SSO setup.
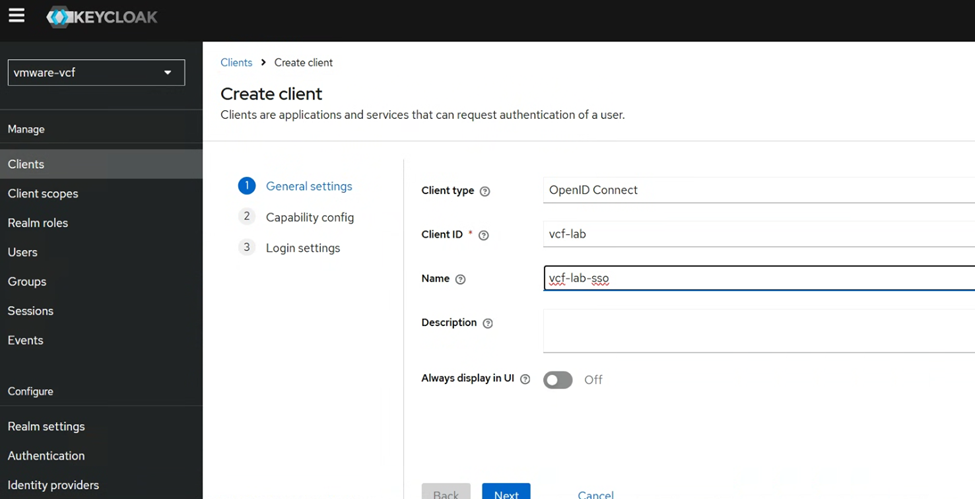
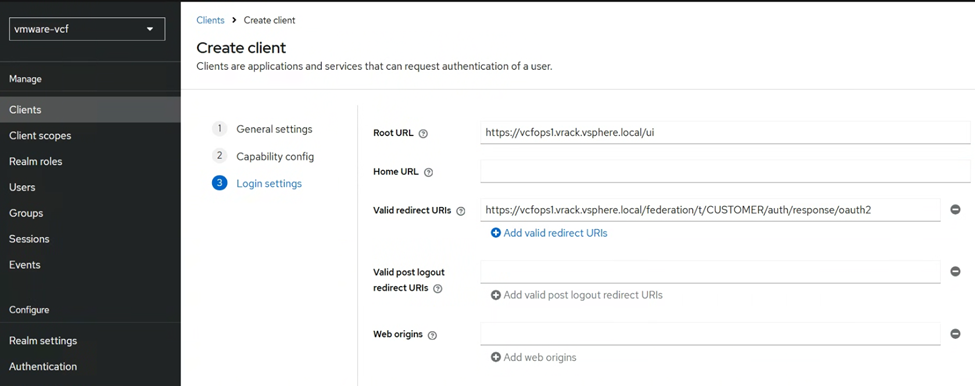
Next we will create the client, inside the vmware-vcf Realm we created just now. Note the Client ID here.
Please create Client by following below settings.
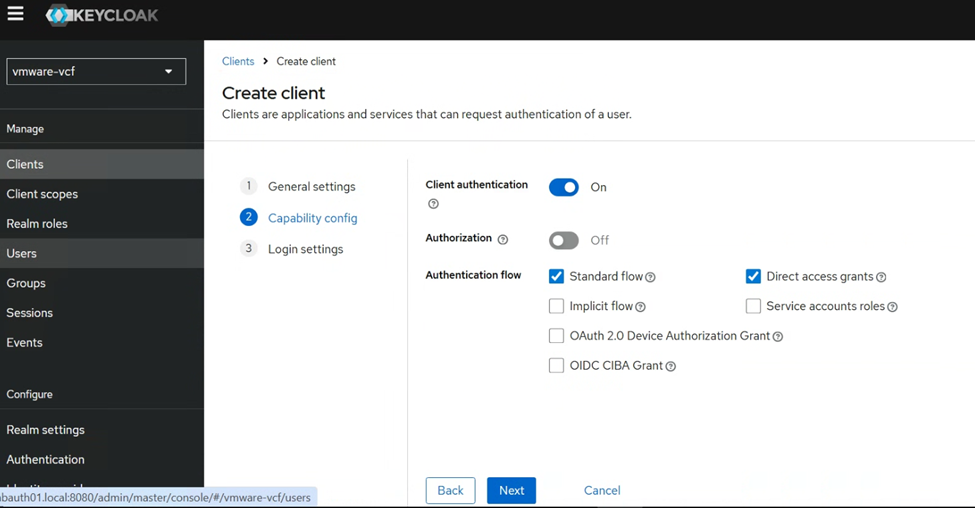
In the login settings, we will paste the Redirect URL that we noted down from the VCF SSO IdP setup wizard earlier.
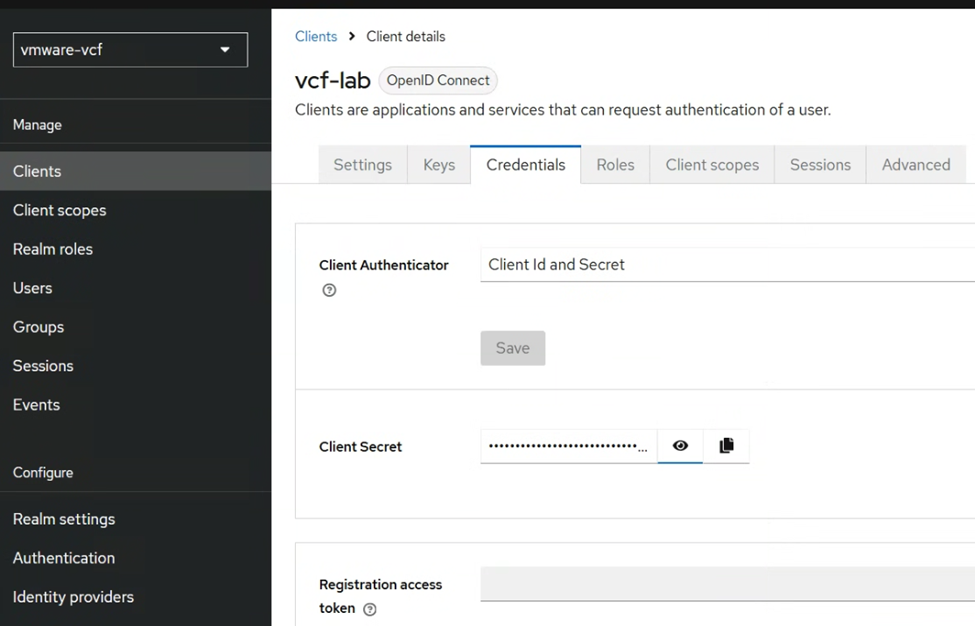
Once the OIDC client is configured, go to the credentials tab, and note down the Client Secret.
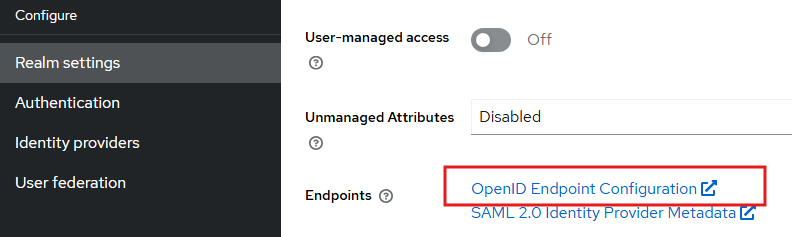
Next go to the Realm settings, and note down the OpenID address URL
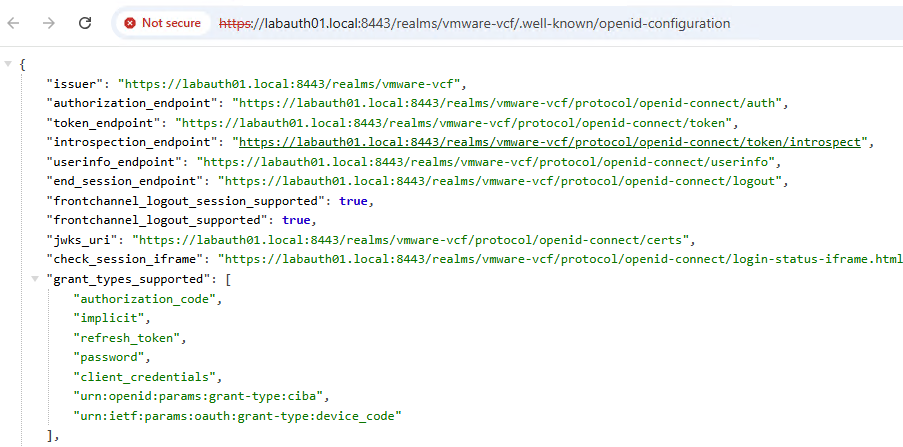
Make sure this URL https://labauth01.local:8443/realms/vmware-vcf/.well-known/openid-configuration is accessible from the vCenter server, check by running the command.If you didnt get the valid response, you should add a DNS entry in /etc/hosts or configure in the centralized DNS server which vCenter have access to.
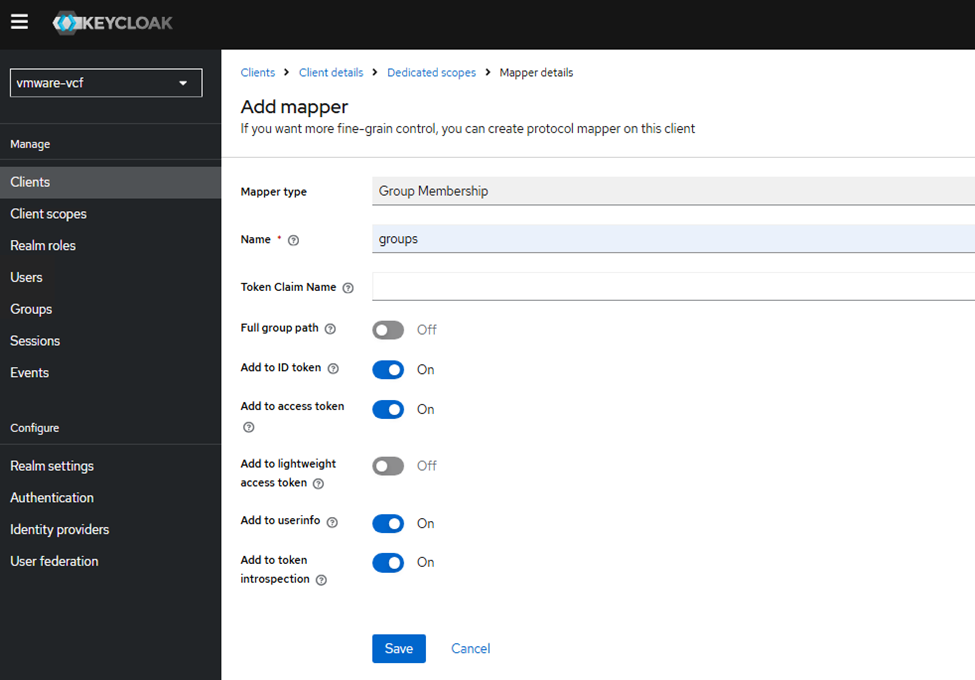
curl -vk https://labauth01.local:8443/realms/vmware-vcf/.well-known/openid-configurationNext, we need to create a client scope, go to the vcf-lab client, click on “Client scopes” tab. Click on the “vcf-lab-dedicated” scope and create a new mapper.

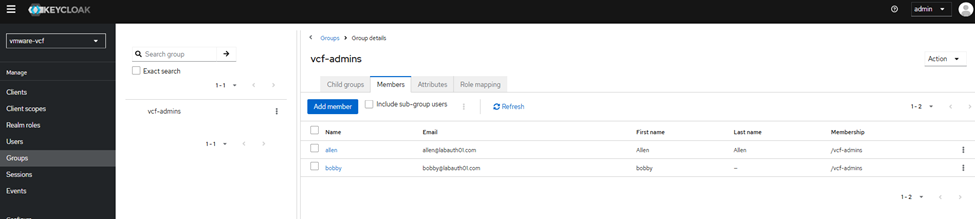
Then I have created two test users allen and bobby added them to a test group called vcf-admins.
With this Part1 is completed, in the next part, we will configure VCF SSO with this Keycloak IdP and test the authentication on various VCF components like VCF Ops, vCenter, NSX Manager etc.
Thank you for reading.!