In this blog, we will design a VM deployment template and validate the placement logic by performing a test deployment. This is a continuation of my automation blog series, where we are building a complete end-to-end VM automation solution using VMware Cloud Foundation Automation- VM Apps Organization.
I recommend read other parts of the blog series to get the full understanding of this series.
- Part 1: Automate VM Builds in VCF9 Automation VM Apps Org – Sample Project
- Part 2: Configure VCF SSO as Identity Provider in VM Apps Organization
- Part 3: Configuring VM Apps Organization for Automated VM Builds
- Part 4: Integrating Embedded vRO with VM Apps Organization in VCFA
- Part 5: VM Apps organization – VM build blueprint design
- Part 6: Publish template to catalog and customize the request form in VMApps
In this part, we will focus on creating the deployment blueprint (template), defining placement logic, and validating the end-to-end provisioning workflow through a test deployment.
First let’s create the blueprint template in VM Apps organization.
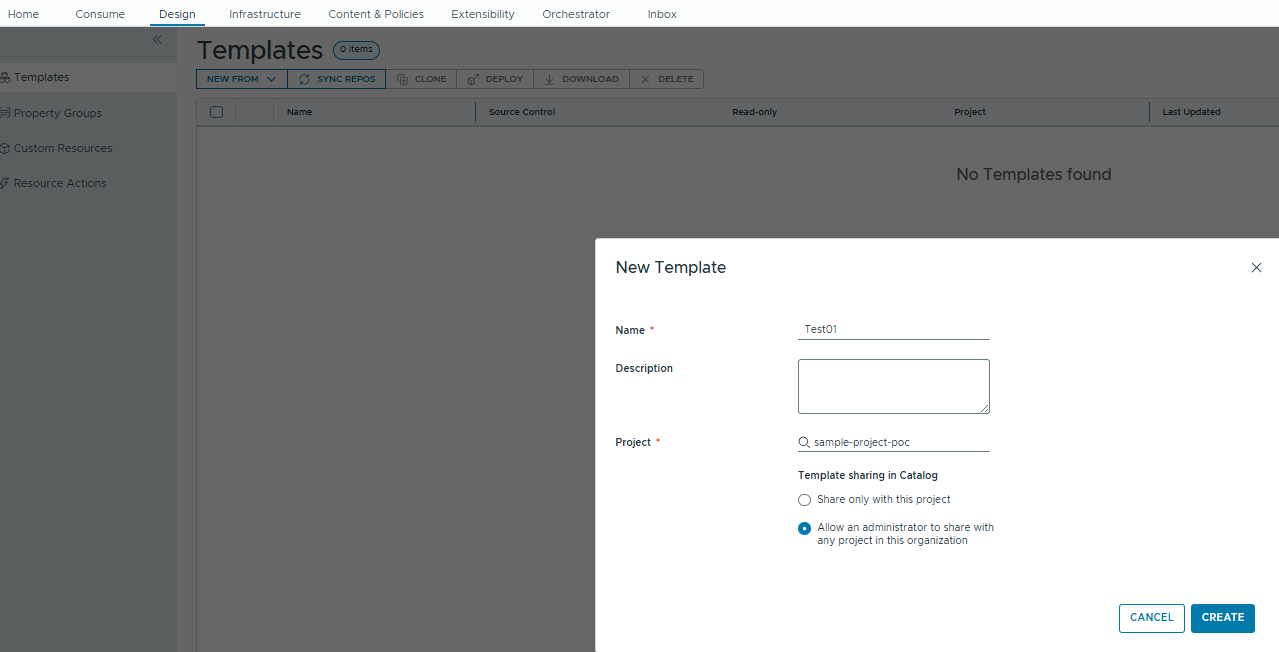
Here I created a template named Test01 and this will be used in project “Sample-project-poc” and I am allowing the sharing across the projects within the organization.
Once we created the template, we will be given with this canvas view like below.
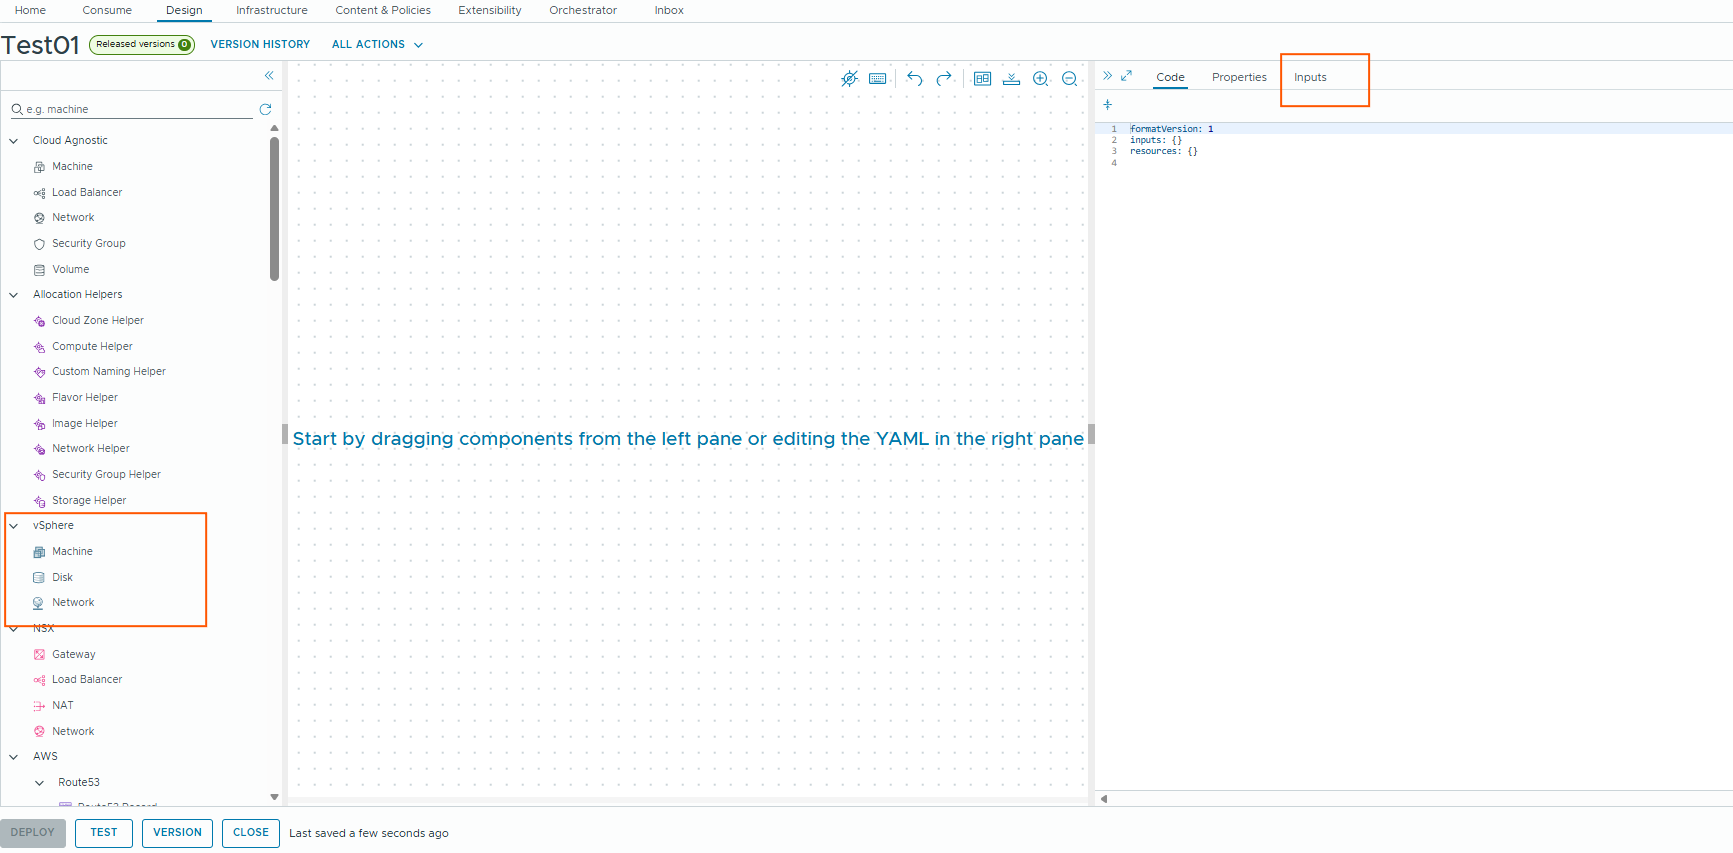
We will be using vSphere objects and design our inputs and use constraint tags to control the resource placement.
Designing blueprint
As per the sample project requirements, the first step is to design the inputs that will drive our automation logic.
From the requirements, we understand that:
VDC (Vizag) is designated for Non-Production (Development, SIT, etc.)
HDC (Hyderabad) is designated for Production
VM name structure should be:
DC- + Environment + OS- + Application- + Function + Instance numberingTo support this, we will design inputs in such a way that it will help us derive values dynamically for naming, tagging, and placement logic.
We start by defining the Environment input, where the user can select:
- Production
- Development
- SIT
Instead of using simple values, we use oneOf with comma-separated constants. This allows us to encode multiple attributes within a single input and reuse them across the blueprint.
Each value represents:
- Full name (prod/dev/sit)
- Short code (p/d/s)
- Category (prod/nonprod)
- Datacenter (hdc/vdc)
- Location (hyd/vizag)
Use hdc or vdc for placement and naming decisions, Use p, d, s in naming and placement conventions.
Use prod/nonprod for tagging and policies.
We will see how these are used when we look at the full blueprint.
inputs:
  environment:
    type: string
    title: Environment
    oneOf:
      - title: Production
        const: prod,p,prod,hdc,hyd
      - title: Development
        const: dev,d,nonprod,vdc,vizag
      - title: SIT
        const: sit,s,nonprod,vdc,vizag
Next, we define the OS image input:
In the sample requirements, it is mentioned that there are two types of OS builds—Windows and Linux. However, since I do not have a Windows template in my lab environment, I will demonstrate using only Linux templates. The overall logic and approach remain the same.
  image:
    type: string
    title: OS Image
    oneOf:
      - title: AlmaLinux10
        const: AlmaLinux10,Linux,al
      - title: Ubuntu 22.04
	const: Ubuntu 22.04,Linux,ub
Here, we are capturing:
- Image name
- OS type (Linux)
- Short code (al/ub)
This can later be used for:
- Naming (OS identifier)
- Tagging
- Image selection during provisioning
Next, we define the input for Application. This input is straightforward. However, if the project has many application codes or requires displaying application descriptions to users, we can use a vRealize Orchestrator (vRO) workflow action to dynamically populate the dropdown. We will discuss this advanced scenario later in another blog.
  application:
    type: string
    title: Application
    enum:
      - SAP
      - JEN
      - GIT
Next, we define the Application Function, which represents the role of the VM:
User can select the default web, app, db server functions or can select other and type the function manually.
  appFunction:
    type: string
    title: Application Function
    oneOf:
      - title: Web Server
        const: web,wb
      - title: App Server
        const: app,ap
      - title: DB Server
        const: db,db
      - title: Other Role
        const: other,ot
  appFunctionOther:
    type: string
    title: Other App Function code, type it here
    minLength: 2
    maxLength: 3
    default: ot
Next, we define the VM size, also known as the flavor. We can either allow users to manually specify CPU and memory values or use predefined flavor mappings that encapsulate these configurations. In our case, we have already defined flavor mappings such as X-Small, Small, Medium, Large, and X-Large in the previous blog. We will use these mappings here and present them to the user as selectable options, ensuring standardized and consistent sizing across deployments.
  flavor:
    type: string
    title: Machine Size
    enum:
      - X-Small
      - Small
      - Medium
      - Large
      - X-Large
Next, we define the app zone. For database workloads, the network is always internal, whereas for application and web workloads, users can choose between internal and external networks. For now, we are providing both options to the user. Although it is possible to further enhance the form using conditional logic (for example, restricting database selections to internal only), we will cover that in a later blog.
  appZone:
    type: string
    title: Application Zone
    oneOf:
      - title: Internal
        const: internal
      - title: External (DMZ)
        const: external
Next, we define the Storage size. User can select Small, Medium, Large, X-Large.
  storageSize:
    type: string
    title: Storage Size
    oneOf:
      - title: Small
        const: small
      - title: Medium
        const: medium
      - title: Large
        const: large
      - title: X-Large
        const: xlarge
Based on the requirements, the selected storage size represents only the application disk. In addition to this, a fixed 50 GB user disk is always attached to the VM. Therefore, the total disk size is calculated by adding the application disk and user disk. As per REQ4 in the requirements, we need to select the datastore/storage policy based on the total disk size. We will define the storage constraint tag as per this requirement.
Next, we define IP address input. User will type the IP Address.
  ipAddress:
    type: string
    title: IP Address
Next,we will deine the resource block.
The first resource defined in the blueprint is the vSphere virtual machine. Under its properties, we define constraint tags that control the placement of the VM within the environment.
constraints:
  - tag: environment:${split(input.environment, ",")[2]}
  - tag: 'appfunction:${split(input.appFunction, ",")[0] == "other" ? "app" : split(input.appFunction, ",")[0]}'
The environment tag is derived from the selected input and is used to distinguish between production and non-production workloads.
Within each environment, there are separate resource pools defined based on the application role:
- Database servers are placed in the DB-pool
- Web and Application servers are placed in the server-pool
The appfunction tag is used to determine this placement. If the user selects “Other,” it is treated as an application server and mapped to the server-pool by default.
resources:
  Cloud_vSphere_Machine_1:
    type: Cloud.vSphere.Machine
    properties:
      constraints:
        - tag: environment:${split(input.environment, ",")[2]}
        - tag: 'appfunction:${split(input.appFunction, ",")[0] == "other" ? "app": split(input.appFunction, ",")[0]}'
      image: ${split(input.image, ",")[0]}
      flavor: ${input.flavor}
      namingReuseNumbers: true
      namingPrefix: '${split(input.environment,",")[3]}-${split(input.environment, ",")[1]}${split(input.image, ",")[2]}-${input.application}${split(input.appFunction, ",")[0] == "other" ? input.appFunctionOther : split(input.appFunction, ",")[1]}'
      networks:
        - network: ${resource.Cloud_vSphere_Network_1.id}
          address: ${input.ipAddress}
          assignment: static
          deviceIndex: 0
          primaryAddress: true
      attachedDisks:
        - source: ${resource["App Disk"].id}
        - source: ${resource["User Disk"].id}
      storage:
        constraints:
          - tag: 'storagesize:${((input.storageSize == "small" ? 75 : (input.storageSize == "medium" ? 150 : (input.storageSize == "large" ? 350 : 500))) + 50) < 250 ? "small" : (((input.storageSize == "small" ? 75 : (input.storageSize == "medium" ? 150 : (input.storageSize == "large" ? 350 : 500))) + 50) <= 750 ? "medium" : (((input.storageSize == "small" ? 75 : (input.storageSize == "medium" ? 150 : (input.storageSize == "large" ? 350 : 500))) + 50) <= 1500 ? "large" : "xlarge"))}'
Next image and flavor are derived from the user inputs.
We are deriving the namingPrefix value from the user inputs.
Next in the storage section, we defined a constraint tag based on ternary expression.
As per the requirements, the storage policy/datastore selection should happen based on the total disk size, here we have two disks, User disk always 50GB. App disk size varies based on the user input (Small – 50 GB, Medium – 150GB, Large – 350 GB, XLarge – 500GB).
Now we need to derive the storage policy/datastore based on the total size. For this I have used that ternary expression.
      storage:
        constraints:
- tag: 'storagesize:${((input.storageSize == "small" ? 75 : (input.storageSize == "medium" ? 150 : (input.storageSize == "large" ? 350 : 500))) + 50) < 250 ? "small" : (((input.storageSize == "small" ? 75 : (input.storageSize == "medium" ? 150 : (input.storageSize == "large" ? 350 : 500))) + 50) <= 750 ? "medium" : (((input.storageSize == "small" ? 75 : (input.storageSize == "medium" ? 150 : (input.storageSize == "large" ? 350 : 500))) + 50) <= 1500 ? "large" : "xlarge"))}'| Total Disk Size | Datastore |
|---|---|
| < 250 GB | hdc-platinum-small / vdc-platinum-small (small-vms) |
| 251 – 750 GB | hdc-platinum-medium / vdc-platinum-medium (medium-vms) |
| 751 – 1500 GB | hdc-platinum-large / vdc-platinum-large (large-vms) |
| > 1500 GB | hdc-platinum-xlarge / vdc-platinum-xlarge (xlarge-vms) |
Next, we defined the network object for the vSphere VM. It is defined separately and used in the vSphere virtual machine object.
Next, we defined the attached disks, disk objects are also defined separately and used in the vSphere virtual machine object.
Cloud_vSphere_Network_1:
    type: Cloud.vSphere.Network
    properties:
      constraints:
        - tag: zone:${input.appZone}
        - tag: 'appfunction:${split(input.appFunction, ",")[0] == "other" ? "app": split(input.appFunction, ",")[0]}'
        - tag: env:${split(input.environment, ",")[2]}
      networkType: existing
  App Disk:
    type: Cloud.vSphere.Disk
    properties:
      capacityGb: '${input.storageSize == "small" ? 75 : (input.storageSize == "medium" ? 250 : (input.storageSize == "large" ? 500 : 1024))}'
      provisioningType: thin
  User Disk:
    type: Cloud.vSphere.Disk
    properties:
      capacityGb: 50
      provisioningType: thin
In the network properties, we defined the constraint tags to derive the correct port group for the selected VM based on the below requirements.
Prod Environment: (hyd – hdc)
Database Networks
| Environment | Network |
|---|---|
| PROD | hprod-db |
Application / Web Networks
| Environment | Network |
|---|---|
| PROD | hprod-servers |
External Access Networks
| Environment | Network |
|---|---|
| PROD | hprod-servers-ext |
Non Prod environment (vizag – vdc)
Database Networks
| Environment | Network |
|---|---|
| DEV | vdev-db |
| SIT | vsit-db |
Application / Web Networks
| Environment | Network |
|---|---|
| DEV | vdev-servers |
| SIT | vsit-servers |
External Access Networks
| Environment | Network |
|---|---|
| DEV | vdev-servers-ext |
| SIT | vsit-servers-ext |
Final blueprint looks like this
formatVersion: 2
inputs:
  environment:
    type: string
    title: Environment
    oneOf:
      - title: Production
        const: prod,p,prod,hdc,hyd
      - title: Development
        const: dev,d,nonprod,vdc,vizag
      - title: SIT
        const: sit,s,nonprod,vdc,vizag
  image:
    type: string
    title: OS Image
    oneOf:
      - title: AlmaLinux10
        const: AlmaLinux10,Linux,al
      - title: Ubuntu 22.04
        const: Ubuntu 22.04,Linux,ub
  flavor:
    type: string
    title: Machine Size
    enum:
      - X-Small
      - Small
      - Medium
      - Large
      - X-Large
  application:
    type: string
    title: Application
    enum:
      - SAP
      - JEN
      - GIT
  appFunction:
    type: string
    title: Application Function
    oneOf:
      - title: Web Server
        const: web,wb
      - title: App Server
        const: app,ap
      - title: DB Server
        const: db,db
      - title: Other Role
        const: other,ot
  appFunctionOther:
    type: string
    title: Other App Function code, type it here
    minLength: 2
    maxLength: 3
    default: ot
  appZone:
    type: string
    title: Application Zone
    oneOf:
      - title: Internal
        const: internal
      - title: External (DMZ)
        const: external
  storageSize:
    type: string
    title: Storage Size
    oneOf:
      - title: Small
        const: small
      - title: Medium
        const: medium
      - title: Large
        const: large
      - title: X-Large
        const: xlarge
  ipAddress:
    type: string
    title: IP Address
resources:
  Cloud_vSphere_Machine_1:
    type: Cloud.vSphere.Machine
    properties:
      constraints:
        - tag: environment:${split(input.environment, ",")[2]}
        - tag: 'appfunction:${split(input.appFunction, ",")[0] == "other" ? "app": split(input.appFunction, ",")[0]}'
      image: ${split(input.image, ",")[0]}
      flavor: ${input.flavor}
      namingReuseNumbers: true
      namingPrefix: '${split(input.environment,",")[3]}-${split(input.environment, ",")[1]}${split(input.image, ",")[2]}-${input.application}${split(input.appFunction, ",")[0] == "other" ? input.appFunctionOther : split(input.appFunction, ",")[1]}'
      networks:
        - network: ${resource.Cloud_vSphere_Network_1.id}
          address: ${input.ipAddress}
          assignment: static
          deviceIndex: 0
          primaryAddress: true
      attachedDisks:
        - source: ${resource["App Disk"].id}
        - source: ${resource["User Disk"].id}
      storage:
        constraints:
          - tag: 'storagesize:${((input.storageSize == "small" ? 75 : (input.storageSize == "medium" ? 150 : (input.storageSize == "large" ? 350 : 500))) + 50) < 250 ? "small" : (((input.storageSize == "small" ? 75 : (input.storageSize == "medium" ? 150 : (input.storageSize == "large" ? 350 : 500))) + 50) <= 750 ? "medium" : (((input.storageSize == "small" ? 75 : (input.storageSize == "medium" ? 150 : (input.storageSize == "large" ? 350 : 500))) + 50) <= 1500 ? "large" : "xlarge"))}'
  Cloud_vSphere_Network_1:
    type: Cloud.vSphere.Network
    properties:
      constraints:
        - tag: zone:${input.appZone}
        - tag: 'appfunction:${split(input.appFunction, ",")[0] == "other" ? "app": split(input.appFunction, ",")[0]}'
        - tag: env:${split(input.environment, ",")[2]}
      networkType: existing
  App Disk:
    type: Cloud.vSphere.Disk
    properties:
      capacityGb: '${input.storageSize == "small" ? 75 : (input.storageSize == "medium" ? 250 : (input.storageSize == "large" ? 500 : 1024))}'
      provisioningType: thin
  User Disk:
    type: Cloud.vSphere.Disk
    properties:
      capacityGb: 50
      provisioningType: thin
Now we will test the placement logic.
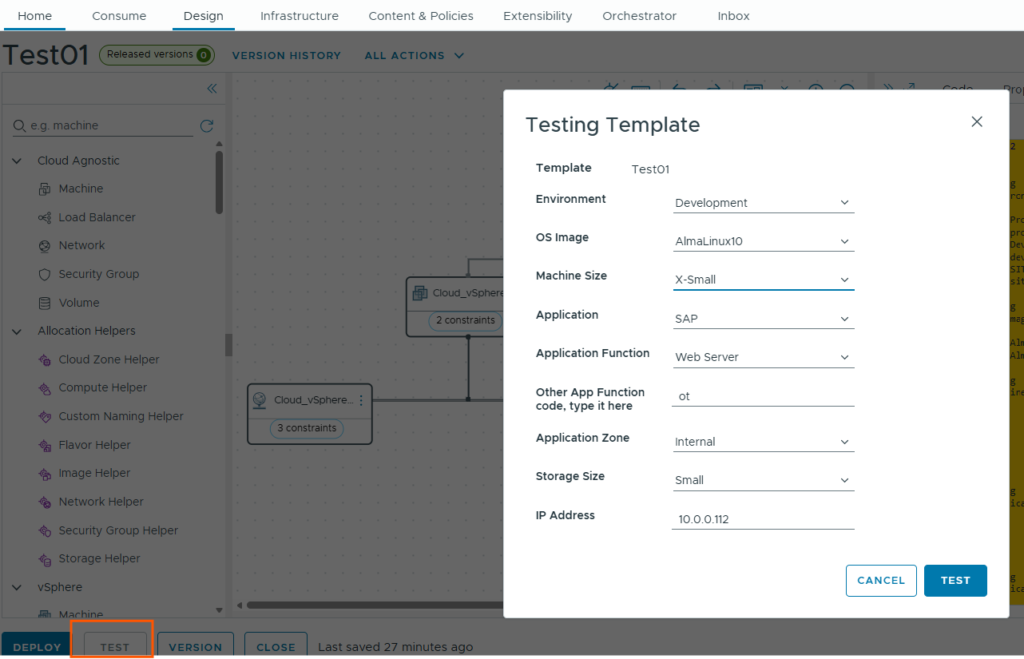
Once the blueprint is ready, we can click on TEST to validate whether all the defined logic and inputs are working as expected.
During testing, it shows “Other App Function” field is displayed even when the user selects an application function such as Web Server. Ideally, this field should only appear when the user selects the “Other Role” option.
This behavior occurs because we have not yet applied any conditional logic to the input form. In a real-world implementation, we can customize the request form to dynamically show or hide fields based on user selections. For example, the “Other App Function” field can be displayed only when “Other Role” is selected.
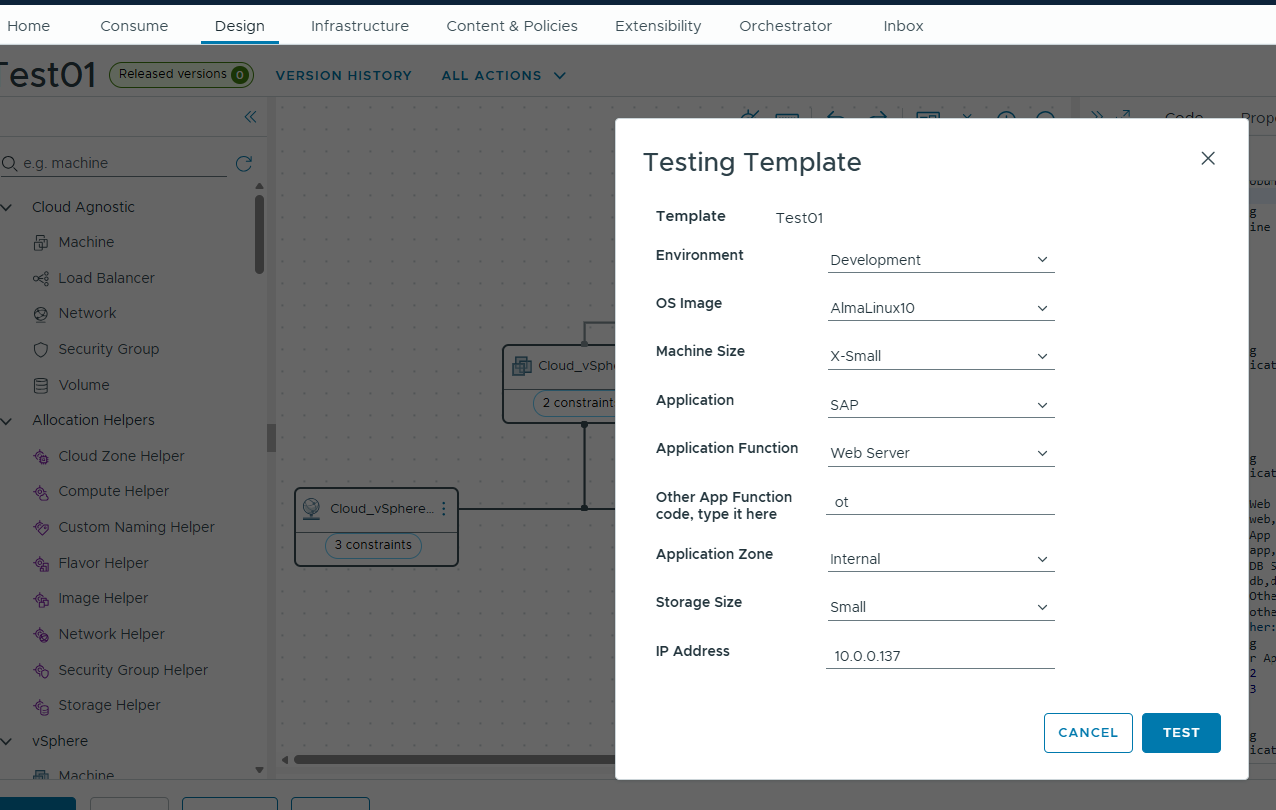
Validation points:
As user selected environment as Development, it should go to vizag-dc location/region which is non-prod. (location code – vdc letter code for development – d)
And OS Image is Almalinux so (OS code should be al)
Machine size X-Small means CPU 1 and Memory 2GB.
Application code is SAP (code used in the naming is sap)
Application function is Web server so (code used in the naming is wb).
Name should be vdc-dal-sapwb-xx
As application function is web, this VM should land in v-server-pool in vizag-dc location/region.
Application zone is internal so network should be vdev-servers.
Storage Size is small means App disk is 50, and user disk is 50GB total is 100GB, so storage policy should be small-vms.
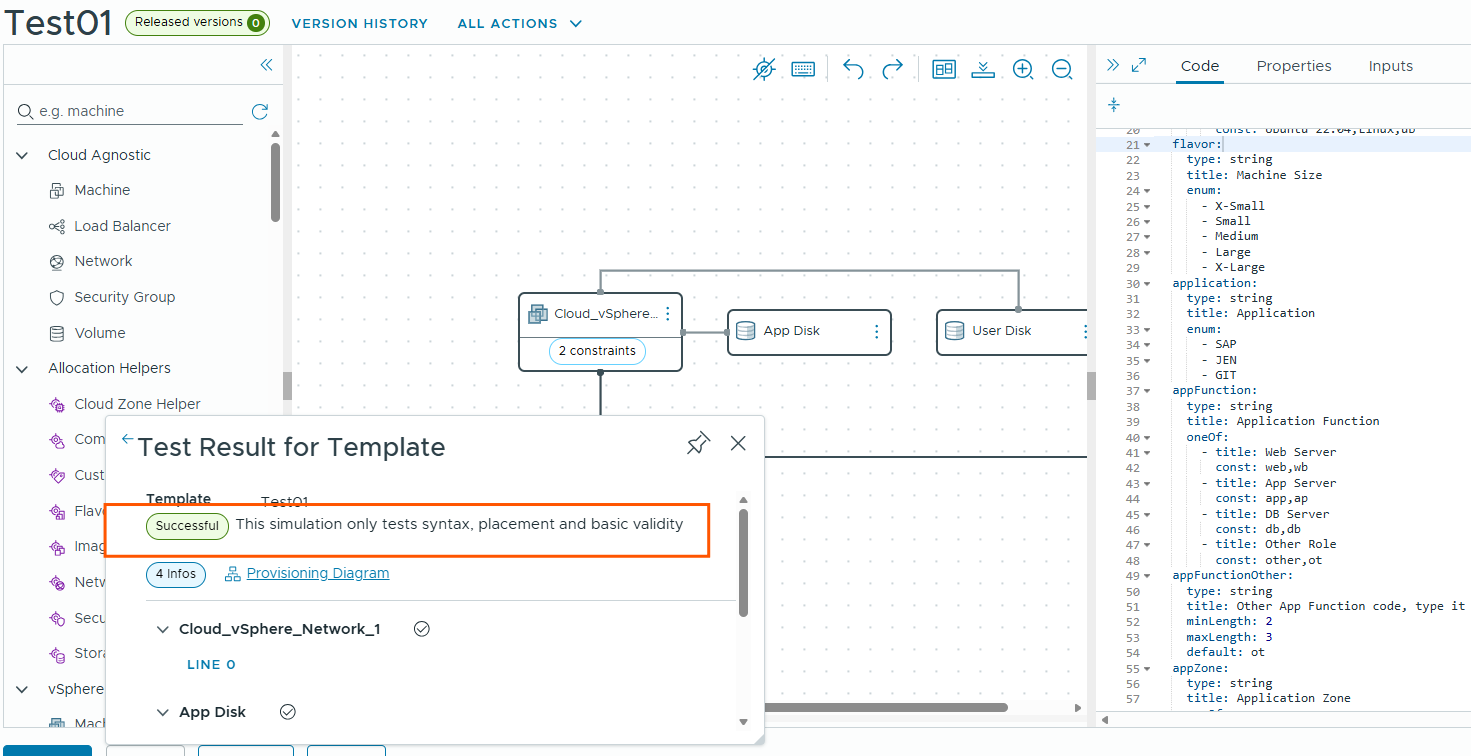
Lets run the test and see if it passed the basic validity tests.
As we can see it passed.
Lets try to deploy the VM and see. Click on the deploy button and provide the inputs, start deployment.
Deployment started.
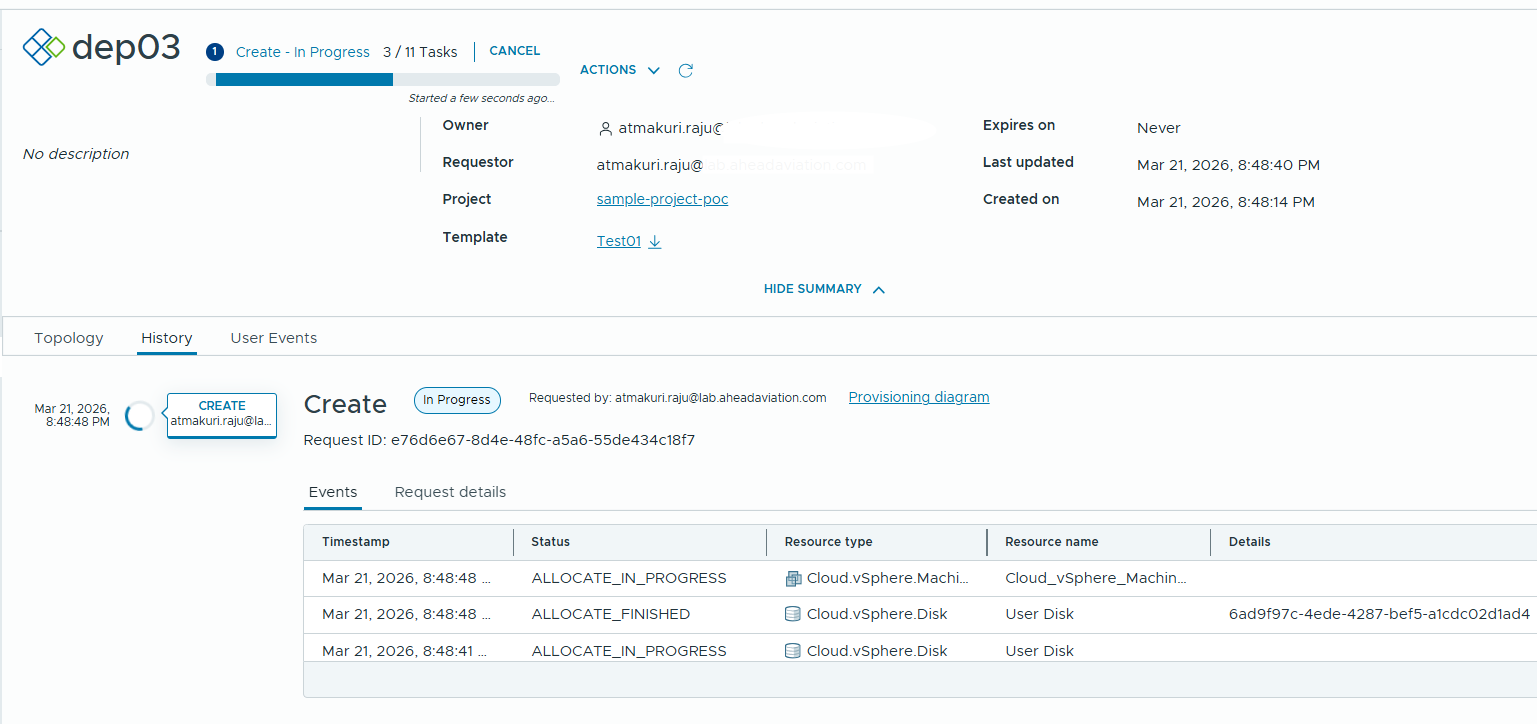
Let’s see generate custom hostname workflow is completed successfully or not.
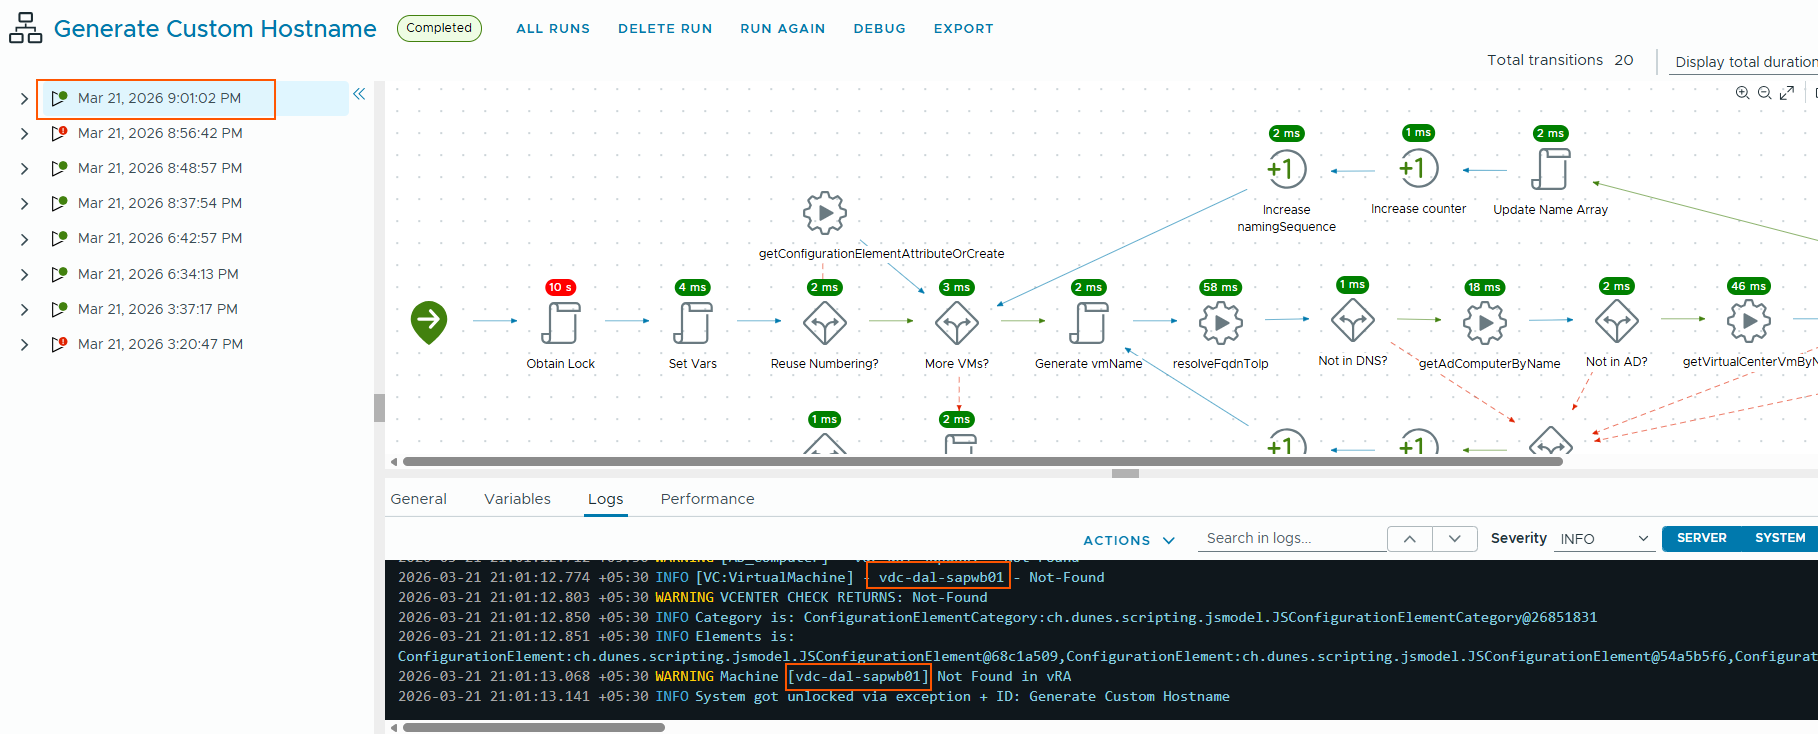
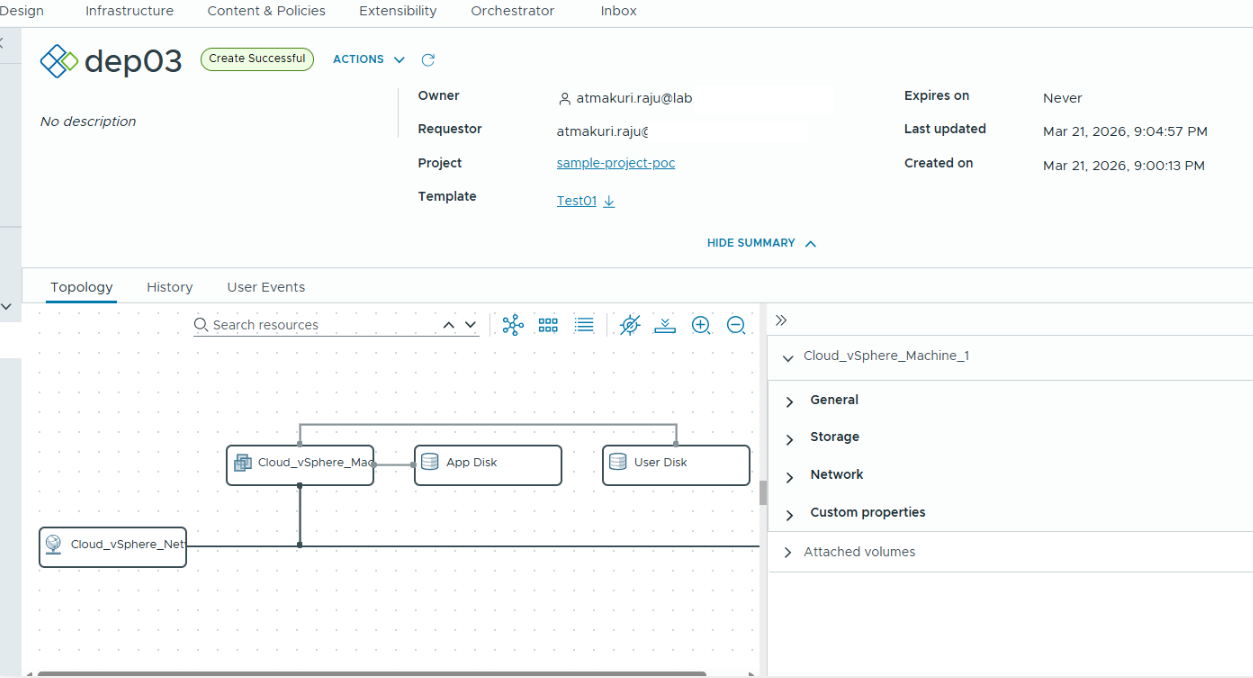
We can see our deployment is successful.
we can see the VM compute placement and name are correct.
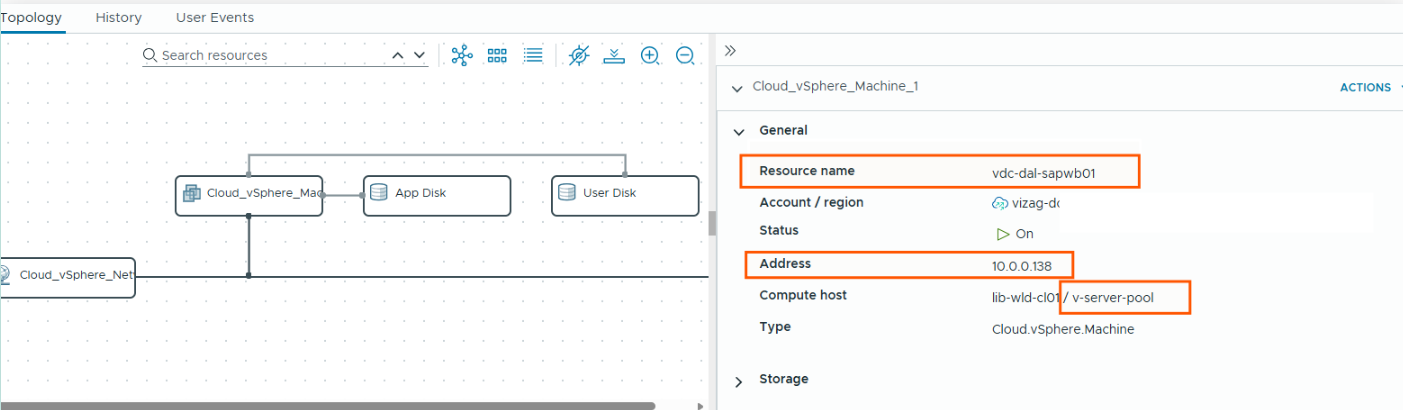
VM got storage policy small-vms correctly.

VM is placed in correct network.

With this blueprint design and testing te deployment completed successfully.
In the next blog, we will see how we can publish this to catalog, and custome the request form and test the deployment from the catalog.
Thank you for reading.